
The intro
If you are like me – an “old school” WordPress theme developer, still hanging in the PHP-based WP theme development “hood”, and have been reluctant to jump into the “not so” new WordPress paradigm shift, been called and described with various names or phrases – “Block themes“, “Full Site Editing“, “Site editor”, “everything is a block” etc. but wanting to (finally) dive into the WordPress’ Block themes “thing” – then this article might be just what you need.
September 29. 2022. update – because of recent changes in naming I updated this and following articles with new naming. Full site editing theme is now a “block theme”
I’ve been looking for some solid documentation, tutorials, resources, etc. After quite some googling and research, I found the resources on this topic somehow scattered and confusing (at least to me), although there are a lot of tutorials, docs, etc. So, I decided to write this article as a helper and a reminder in my learning process, and as a guide for others out there, who have the same problem as I do.
To follow this article, it’s assume you “know your ways around WordPress”, and you have already created some classic WordPress themes in the past.
Other requirements would be to have at minimum WordPress 6.0 installed.
The majority of methods to register, create or include templates, template parts, and patterns described here are valid only for WordPress 6.0 +
Where to start / Resources
These are the resources I mostly used to introduce myself to new concepts of Block themes, and to create my first Block theme.
- Rich Tabor A new era … 🔗 – a great way to grasp the basics of Block themes and WP Site Editor concepts
- Theme Developers Handbook / Block Themes 🔗 – WP.org official docs – part with Block themes.
- Classic vs. Block themes 🔗 – this also looks like a place for “classic themer” to start.
- WordPress Full Site Editing (WP FSE) 🔗 – a great resource for learning about block themes by Carolina Nymark.
- WP FSE / Creating WordPress block themes – create Block theme from the scratch
- WP FSE / Theme Generator tool 👈🏻 I started here. Generate and download a starter theme.
I recommend reading Rich’s article “A new era of WordPress themes is finally here” first, and having WP.org theme developers handbook and WP FSE, or other resources, in your browser tabs for reference while following this article.
The minimum for WordPress to recognize a theme’s full site editing capability, it needs to include an index.html file inside the “templates” directory, and the style.css to enable theme activation. I would recommend adding an empty index.php to the theme root, for security reasons (more info here 🔗 and here 🔗 ).
The starter Block theme
The first step for me (since I like to just jump into code), was to find and download a basic starter block theme, with just enough options and settings. There’s a great Theme Generator tool on the WP FSE site, from where I downloaded the “Advanced” starter theme because it included additional WooCommerce templates (I have an ambitious plan for my first Block theme to support WooCommerce 🙂). If you follow this article, I recommend you download the same starter theme. When you click on the “Generate” button, download the zip file and unpack it in your “wp-content/themes” dir.
If you don’t want to go with the starter block theme, you can follow the “super quick guide for eager theme developers 🔗” :
- Create a new theme directory inside the
wp-content/themesdirectory. - Create a style.css file for your new theme.
- Create two new directories inside the theme dir:
templatesandparts. - Inside the
partsdir, create an HTML file calledheader.html. - In
header.html, add the following code:<!-- wp:site-title /-->and save. - Inside the
templatesdir, create an HTML file calledindex.html. - In
index.html, add the following block code, and save:<!-- wp:template-part {"slug":"header"} /--><!-- wp:query --><div class="wp-block-query"><!-- wp:post-template --><!-- wp:post-title /--><!-- wp:post-date /--><!-- wp:post-content /--><!-- /wp:post-template --></div><!-- /wp:query --> - Activate the theme.
The Theme Handbook / Block Theme Setup 🔗 page provides the info about common file structure for Block themes.
Block theme structure
This is how the “Advanced” generated started theme is structured and how the theme looks when activated:


I have created some dummy content (using WP-CLI post generate 🔗 and WooCommerce Smooth Generator 🔗), so there’s more than just a “Hello World” post here … But, yeah, this is as simple as it gets.
I will ignore (at least, for the moment) various linting, sniffing, compiling, and script bundling files (.babelrc, eslint, stylelint, composer, gulp etc.) and focus on this file:
- theme.json – probably the most important theme file, containing most of the configuration for styling and customizing an Block theme.
and these directories:
- templates – here are all the HTML template files, the main templates used by the theme, following the same hierarchy 🔗 as PHP classic theme templates. Inside these files, there is an HTML with HTML commented block settings – the block HTML markup.
- parts – files inside are also files with block HTML markup used for template parts, such as header, footer, sidebar, and eventual variations. Template parts are layout parts being reused in templates. Files contain blocks HTML, best if created in Site editor (templates editor).
- patterns – also made out of blocks, patterns are predefined content layouts, but since files for patterns are PHP, content, media, etc. can be included via PHP or WordPress functions.
The functions.php – the “old” and familiar functions file, now has lesser importance but is still needed. I will explain more about the “lesser” part in the following section. The style.css – is also a familiar file, but, other than the file header with theme info, essentially not needed for styling anymore, which is also connected to the theme.json file.
I will cover the theme.json file in the following article – part two of Block themes for classic theme developers 🔗.
Functions.php and style.css
Block themes still require these two “legacy” files – functions.php and style.css.
Functions.php is used primarily for enqueuing block styles. Many of the PHP configuration functions, such as many add_theme_support, are now gone, with theme.json taking over those functionalities.
In our starter theme, the only place where the add_theme_support is used is for “wp-block-styles” opinionated block styles support, together with wp_enqueue_block_style for each block of choice (all hooked to the “good old” after_setup_theme hook). There’s also the wp_enqueue_scripts hook with theme style.css and shared styles enqueued.
Shared styles are “shared “because they get enqueued also for the block editor, with add_editor_style (hooked also to after_setup_theme).
Style.css is now down to file header with theme info (fetched usually with wp_get_theme() PHP function). Our starter theme has only a couple of custom styles, and, in many future cases, more than a couple won’t be even needed (yes, because of theme.json, again 😉 ).
Templates
Let’s start with the new Block theme stuff now – templates first – the containers of all elements defined in the Block theme. Block theme templates are following the same hierarchy as classic theme templates – if no home.html or front-page.html is present, the index.html will be displayed as the default frontend homepage (of course, if in WP admin settings/ Reading the “Your homepage displays” is set to “Your latest posts”).
The templates/index.html and templates/page.html are equivalent to the index.php and page.php from classic themes.
If we open the templates/index.html file we will see following code:

Yes – the main template file without the <!DOCTYPE>, <html>, <head>, <body> HTML tags, no get_header(), get_footer(), get_template_part() functions (of course, it’s HTML) … All of this is, as mentioned before, the block HTML markup – HTML tags wrapped in comments which contain block settings formatted as JSON.
WordPress creates all the base HTML elements (<html>, <head>, <body>), and enqueues all the scripts. All the templates are loaded inside the <body> tag, in the ‘wp-site-blocks’ div wrapper (this wrapper cannot be changed or deleted).
Hooks for various function filters and actions are still available.
More info on that here 🔗
For example, the <main> element, which is actually a group block, translates like this:
| HTML Comment / JSON setting | HTML |
| <!– wp:group | The group block definition, creates HTML element, adds CLASS attribute “wp-block-group” |
| “tagName”: “main” | makes group block HTML element have a <main> tag |
| “align”: “full” | adds a CLASS attribute with selector “alignfull” |
| “style”: { “spacing”: “padding” … } | adds a STYLE attribute with multiple CSS styles within |
| “layout”:{“inherit”: true} | no HTML tags or attributes output, only used for the editor. |
The Query Loop is the main block in the Index template – and it replaces the old WP_Query (“The Loop“). It includes the Post template block, with the individual post loop blocks – Post title, Post author, Post date, Excerpt, etc. replacing the classic theme functions: the_title(), the_content(), the_permalink() etc. The Query block’s inner blocks – wp:post-[title, author, date, terms ...] are comments-only (with the block settings, no HTML).
At the top and at the bottom, the Index template includes the wp:template-part, to create a header and footer, and these template parts can be used in all other templates (like classic get_template_part() function).
Every block in the template is rendered to the block HTML markup. If you are familiar with how the block settings JSON is structured, and how it is used by the block editor to build the blocks, you can write all the template code manually. But if there is just a small misalignment between JSON and appropriate HTML, the block will produce an error in the editor. So, the recommended method to edit/create templates would be – in the Site Editor > Templates.
To edit the index.html template, click on the “Edit site” in the top admin bar, or, in the WP admin, go to Appearance > Editor, to open the site editor:

Editor loads with complete template to edit, including all the template parts, in this case, the Header and the Footer. At the top of the editor, there’s a menu where you can choose to edit also Header and/or Footer.
When finished changing properties, layout, and blocks of the Index template, click on the right top three dots for the options menu and switch to code view. Copy the code to your theme index.html, save it there, and that’s it. Your theme has a new index.html template ready!
Heads up: although the template parts are editable in the template editor, those edits won’t be visible in the code view (only if the template part itself is replaced).
Copy the code without the <!-- wp:template-part … (in this case both header and footer parts) and paste it into the index.html theme template.
Template parts can be edited and exported as code to theme template parts in the separate template parts editor.

After literally a couple of minutes of editing, copying code, and saving it to index.html, we came from

to

Not much, but remember how much it would take to make such changes with the classic theme, PHP, CSS, HTML, and template functions …?
Editing in the block editor, and copying the code to your theme template or template part (not saving it in the template editor) is a good way to create Block theme templates (as Rich Tabor suggests).
When a template is saved in the template editor (and in the database), it has precedence over the theme bundled templates.
However, template editor-saved templates can be reverted to their default state (see the pic below).


Note that in the “Templates” page (as well as the “Template parts” page) there’s an “Added by” column showing the origin of the template part, that is – the theme, plugin, or user-created template or part.
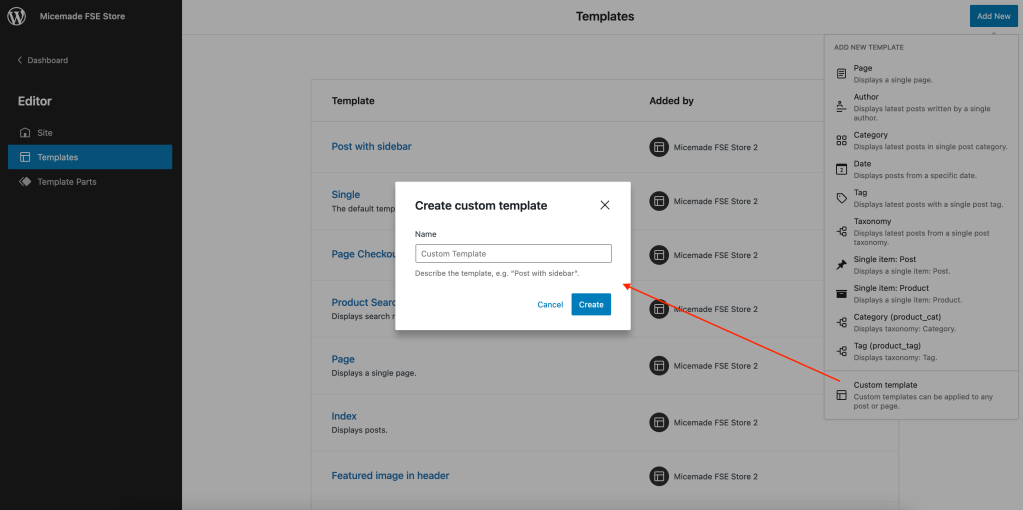
By clicking on the “Add new“, the user can create Templates (if any template used by WP hierarchy is missing from the theme – see the pic below) or Template Parts – any number of header or footer variations can be created, or general type of template parts.


Custom templates can be created too, not only the ones that fit into the WordPress template hierarchy. To register those, the “customTemplates” setting is in the theme.json file and it contains an array of custom template settings. I will cover the theme.json later, so for now, let’s create a template that follows the WP hierarchy – the “front-page.html”.
It’s worth mentioning that with the “bleeding edge” functionalities brought by the Gutenberg plugin, it will be possible to add custom templates or templates specifically for selected pages, posts, or categories, in the editor, completely without coding. With the Gutenberg plugin (v.13.7.3 at the time of writing this) these are new options available to users:


When, if, and how these features (among all others) will be implemented in the core is yet to be seen. More info in this article by Justin Tadlock in the Make WordPress Core. To see what’s coming in the next core updates, this might be the place to get updated: Make WordPress Core/Roadmap to 6.1
Explore new Gutenberg features by all means, but this article will continue without the Gutenberg, with the current core-only features.
Creating a new template
To create my first new template, I decided for my new theme to have a static front page instead of the index with the latest posts. To do so, I copied the templates/page.html to the templates/front-page.html, because front-page.html takes precedence over index.html (template hierarchy) – and removed all the blocks to start blank. This is the front-page.html code, cleared of all blocks from page.html (the only thing left is a Group block to insert new blocks inside it, between that <main></main> tags):
<!-- wp:template-part {"slug":"header","tagName":"header","className":"site-header is-style-micemade-fse-store-2-sticky"} /-->
<!-- wp:group {"tagName":"main","align":"full","layout":{"inherit":true}} -->
<main class="wp-block-group alignfull">

</main>
<!-- /wp:group -->

<!-- wp:template-part {"slug":"footer","tagName":"footer"} /-->

After “playing” with blocks in the Template editor, downloading a few stock images, and exporting the code from the Template editor to the theme’s front-page.html template file (it took me an hour or so because I’m still not too fast with the block editor), my Block theme homepage transformed drastically:
From a simple index page with blog posts to a storefront landing page, all in the template editor. Since I decided to create a WooCommerce-ready theme, I installed the plugin and used its product and product category blocks. For my final theme, I will most likely convert the front-page template content into block patterns, to register patterns conditionally, if the WooCommerce plugin is active.
I will cover patterns later, to show how to include patterns in the theme (there are two ways to do it).
Off course, the theme already has a theme.json with pre-defined settings, styles, etc., and those settings also made it possible to create this new layout. I will also cover theme.json later on.

Template parts
Template part theme files reside in the “parts” directory and, same as templates, template parts are HTML files with the block HTML markup. Template parts can be edited the same way as the templates – editing in the block editor, and copying the code to theme files, in the “parts” dir.
The parts/header.html and parts/footer.html are equivalent to the header.php and footer.php from classic themes. They are reusable in templates in a similar way as the classic theme template parts are included with the get_template_part() WP function.
Template parts can be edited within the template editor, together with the main template and other template parts, but, as explained before, the edits won’t export to template code (template only references to template part with wp:template-part comment settings).
To export the template part’s code, use the template parts editor, which can be accessed in the editor menu “Template parts” (see the screenshot above).
Bellow is the example of editing template part “Header” separate from any page templates, and how the part code looks like:


That’s it – edit the template part, copy the code and save it to your theme. You can add as many headers, footers, sidebars, or other template parts which you can reuse within the templates, adding them to templates via the “Template part” block (or wp:template-part code …).
Creating a new template part
When creating a new template part – an alternate footer, I used a similar method as before, with the template file – I copied the existing file, the “footer.html” from the “parts” directory, to the new “parts/footer-large.html“. You can also create an empty file if you want a build completely different footer from scratch.
A new file will be registered and displayed in the Template Parts editor, with a title created from the name of the file – to give it a more readable name and assign it to a template area, a new property has to be added to “templateParts” setting array, in the theme.json file. There is another reason for this addition and I will explain it below.
... other theme.json settings
"templateParts": [
    ... some other template parts
    {
        "name": "footer",
        "title": "Footer",
        "area": "footer"
    },
   {
        "name": "footer-large",
        "title": "Large footer",
        "area": "footer"
    }
],
... other theme.json settings

And again – open the “Large footer” template part in the editor, “play” with blocks and settings, and when satisfied, switch to code view and copy the code to the theme’s “footer-large.html” file.


The first screenshot from above shows the final Large footer design, before copying the code into the “footer-large.html” (in the template part editor).
The second screenshot shows how to insert the part into a “Front page” template by replacing the existing footer template part. The new template part will not be visible in the “Choose a footer” modal if not added in theme.json settings.
When replaced, switch to the code view, and copy and paste (replace) the template part code in the “front-page.html” file header, or in any other template files in the “templates” directory:
<!-- wp:template-part {"slug":"footer-large","theme":"micemade-fse-store-2","tagName":"footer"} /-->With time, you will probably learn the syntax and be able to add the template part code manually, skipping the insertion of template parts in the editor.
Template and template parts additional notes.
- We can save customizations to templates and parts in the Site editor as Custom Post Types, in the database as
wp_templateandwp_template_partpost type, in {$prefix}_posts table. - Saved templates and parts customizations precede theme templates and parts, but customizations can be reverted to original files added by the theme.
- When adding custom templates or template parts, the “
customTemplates” and “templateParts” settings in theme.json have to be defined.
More details about the templates and template parts:
Patterns
Block Pattern is a pre-defined collection of blocks that forms a specific layout, being a section of a page or an entire layout. Creating a custom pattern (at the moment) requires some level of coding, there is no way of creating a pattern visually and saving it in WordPress, like the Templates or Template Parts in Site editor.
Patterns can (and should) be created the same way as Templates and Template Parts – via Site editor (within the template editor or post/page editor) and then copy the code and paste it into pattern PHP files. Yes – PHP files this time. In the case of our starter theme, inside the “patterns” directory.
PHP pattern file looks very similar to a template or template part file, as it has the same block HTML markup, except for the PHP file header, including the possibility to use WordPress PHP functions.

The file header has the properties needed for registering the pattern – the required Title and Slug and optional Categories, Block Types, etc. The slug must follow the naming convention namespace/title, or theme-name/pattern-file-name (without “.php”).
The pattern code screenshot from above is an example of how to use PHP or WordPress functions in the pattern – to include theme images and/or translatable text.
Pattern files inside the (theme root) “patterns” directory is a new pattern registration method introduced with WordPress 6.0.
The second method, the older one, is the register_block_pattern()🔗 function, which still can be used if, for example, you want to place a pattern in a custom dir, like “inc/patterns“, like in the example of Twentytwentytwo default theme:
Registering the patterns:
$block_patterns = array(
    'footer-default',
    'footer-dark',
    'footer-logo',
    '{...other patterns}',
);
foreach ( $block_patterns as $block_pattern ) {
    $pattern_file = get_theme_file_path( '/inc/patterns/' . $block_pattern . '.php' );

    register_block_pattern(
        'twentytwentytwo/' . $block_pattern,
        require $pattern_file
    );
}
Contents of the $pattern_file:
return array(
    'title'      => __( 'Default footer', 'twentytwentytwo' ),
    'categories' => array( 'footer' ),
    'blockTypes' => array( 'core/template-part/footer' ),
    'content'    => '<!-- wp:group {"align":"full","layout":{"inherit":true}} -->
<div class="wp-block-group alignfull"><!-- wp:group {"align":"wide","style":{"spacing":{"padding":{"top":"4rem","bottom":"4rem"}}},"layout":{"type":"flex","justifyContent":"space-between"}} --> ... more block code'
);
The register_block_pattern requires two arguments: the title (a machine-readable title with a naming convention of namespace/title) and the array of properties (Code reference 🔗). The title argument matches the “slug” property from the file header, used in the new WP 6.0 + method of registering patterns.
The properties array must have the “title” and the “content“, all other properties are optional. The “content” is a Block HTML Markup for the pattern.
The pattern can be assigned to one or more default categories (Featured, Buttons, Columns, Gallery, Headers, Text, Query) and by using the register_block_pattern_category 🔗 function you can create theme pattern categories.
Both register_block_pattern and register_block_pattern_category should be called from a handler attached to the init hook:
function my_theme_register_my_patterns() {
  register_block_pattern( ... );
}
add_action( 'init', 'my_theme_register_my_patterns' );

function my_theme_register_my_pattern_categories() {
  register_block_pattern_category( ... );
}
add_action( 'init', 'my_theme_register_my_pattern_categories' );
The new way of registering patterns, since WP 6.0, is much simpler and the workflow for creating patterns is similar to creating templates or parts. However, to expand features with, for example, custom pattern categories or unregistering core patterns functions like registering_pattern_category or unregister_block_pattern and WP hooks still must be used.
You can find the block pattern-related functions in our starter theme, inside the inc/register-block-patters.php file.
… Worth mentioning:
There is a WordPress.org Pattern directory page, which you can also use in your theme, in a couple of ways:
- Patterns from the WP.org directory can be copied directly from the site to the block editor or theme pattern file, or
- Include the patterns as an array of pattern slugs in theme.json, which will make those patterns available in the inserter for the block and template editor. Patterns array is added in the root level of theme.json, like this:
{
    "$schema": "https://schemas.wp.org/trunk/theme.json",
    "version": 2,
    "patterns": ["image-and-text","personal-bio" ...]
    ...
}
Patterns additional notes
- Once the patterns are inserted they have no link to the original block pattern that they were created by. On insertion, they become regular blocks. Therefore it is not possible to adjust all occurrences of a block pattern after it has been used. (source 🔗)
Patterns resources:
Templates, parts, and patterns in theme.json
As I already mentioned, theme templates and template parts register in the theme.json. Patterns in theme.json are a special case because setting patterns will not make use of patterns from the theme, but instead, the patterns from WordPress.org Patterns Directory 🔗.
Here’s how a template, template parts, and patterns are configured in theme.json:
{
    ...
    "patterns": ["image-and-text","personal-bio" ...],
    "templateParts": [
        {
            "name": "header",
            "title": "Header",
            "area": "header"
        }...
    ],
    "customTemplates":[
        {
            "name", "featured-image",
            "title", "Featured image in header",
            "postType", "[ "post", "page" ]"
        }
    ]
}
This is just one small part of what theme.json configuration settings, the rest of the configuration and details will be covered in part two of FSE for classic theme developers:

Leave a comment